Showing posts with label Software. Show all posts

Tuesday

Schedule a weekly defragmentation

0 comments
If you think your computer has gotten slower since you bought it. One biggest factors that slows down your computer's performance is fragmentation,in which storage space is used inefficiently, reducing storage capacity and in most cases performance

Defragmenting your hard drive is the process of putting all the scattered pieces of files back together. Microsoft Windows XP includes a tool that will defragment your hard drive for you. To keep your system performing well, it’s a good idea to have Windows XP automatically defragment your hard drive every week.

To schedule a weekly defragmentation

1. Click Scheduled Task.
Start -> Accessories -> System Tool -> Scheduled Tasks


2. In the Scheduled Tasks window, double-click Add Scheduled Task.


3.In the Scheduled Task Wizard, Click Next.

4. Click Browse.

5. In the File name box, type %systemroot%\system32\defrag.exe, and then click Open


6. Under Perform this task, Click Weekly, then click Next.

7. Set the time and day of the week you would like to defragment your hard drive. For best results, choose a time when your computer will be on but you will be away from it. Click Next.

8. Type your password in both the Enter the password and Confirm password boxes. Then, click Next.

9. Select the Open advanced properties for this task when I click Finish check box, and then click Finish.

10. In the Run box, add C: to the existing command. Make sure you include a space before the “C:”. Then, click OK.

11. In the Set Account Information dialog box, type your password in both the Password and Confirm password boxes. Then, click OK.

Windows XP will defragment your hard drive at the time you have scheduled. During defragmentation, a black window will open. If you happen to be working at your computer when the window opens, you can ignore it. The window will automatically disappear when defragmentation is complete.

Friday

How to Enable Net Send Messenger Service on Windows XP

0 comments
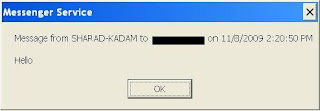
Sends messages to other users, computers, or messaging names on the network. If you installed Windows XP Service Pack2 or later, the Messenger service was disabled in order to prevent the net send spam that was getting popular a few year ago. You can manually re-enabled the Messenger service again to allow you to send and receive net messages.


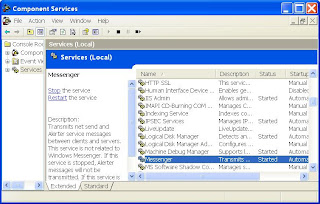
If service is not enabled then you will receive the error. In Order to enable the Service follow this steps. • Open Control Panel. • Open Administrative Tools • Open Component Service • Look for Service named “Messenger”. • Double click service.


Choose “Automatic” for startup type. Then click the “Start” button to start the service.

Ask the friend you want to message to enable it too(Messenger service), then you will be able to send quick messages to your friend. If you are on same network, the computer name or Windows login name will work. Otherwise, the IP address will do the work.

The Syntax:
net send [computer name|login name|ip address] [message]

Automatic Windows Shutdown with Scheduled Tasks

0 comments
You can shutdown Window automatically without using any external software. Use the tools provided by windowss. Scheduled Tasks gives you an easy interface to scheduled an application to run at certain time. Shutdown.exe is a DOS command that can locally and remotely shut down your computer.

Let me give some detail about Shutdown.exe.

Usage: shutdown [-i | -l | -s | -r | -a] [-f] [-m \\computername]
[-t xx] [-c "comment"] [-d up:xx:yy]

No args Display this message (same as -?)
-i Display GUI interface, must be the first option
-l Log off (cannot be used with -m option)
-s Shutdown the computer
-r Shutdown and restart the computer
-a Abort a system shutdown
-m \\computername Remote computer to shutdown/restart/abort
-t xx Set timeout for shutdown to xx seconds
-c "comment" Shutdown comment (maximum of 127 characters)
-f Forces running applications to close without warning
-d [u][p]:xx:yy The reason code for the shutdown
u is the user code
p is a planned shutdown code
xx is the major reason code (positive integer less than 256)
yy is the minor reason code (positive integer less than 65536)


Next Open Windows Scheduled Tasks by going to
Start -> Accessories -> System Tools -> Scheduled Tasks


Now double click on “Add Scheduled task” and click “Browse” to look for shutdown.exe


Browse for shutdown.exe located in C:\WINDOWS\System32\shutdown.exe. This exe is used to shutdown our computer. Give the task any name you want, for e.g., “Auto Shutdown” and make sure to check Perform task option button. You can select any option depending on your requirement. I selected “One time only”.


Keep clicking Next as the dialogue are self explanatory, being sure to provide your windows password when needed until the last prompt. Finally after completing the above step you need to customize the shutdown command slightly further so check “Open advanced properties” before you click Finish.


As the advanced dialogue opens, add “-s -f” to the end of the command as shown in the red box. The “-s” option specifies a shutdown and the “-f” command forces all application to close.


When everything is done, you can see a new scheduled task, You can now take the rest, system will automatically shutdown.

Write Batch File to Start Program in Startup

0 comments
You can start your computer applications automatically and control the sequence of the programs when your computer comes up. Here we consider you want to run three different applications (WordPad, calculator, and notepad) and minimized automatically with sequence at windows startup. However, you can write a batch file to do the job for you. Open any text editor like notepad and type the following command.

Now choose the option, Save As to save this file with .bat extension. For example filename.bat. Enclosed the name in double quote at the time save like “Mystartup.bat”

Now Right- click on Start button and choose open > Double click Programs > here open Startup folder. Now drag your .bat file in the Startup folder and close the dialog box.

Next time When you restart the computer, WordPad, Calc will start first and then Notepad. You won't see the batch file run because you told it to run minimized.

Remove Virus from USB

0 comments
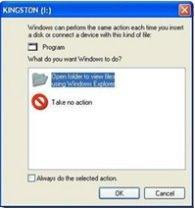
One of the ways by which a virus can infect your PC is through USB/Pen drives. Common viruses such as ’Ravmon’ , ‘New Folder.exe’, ‘Orkut is banned’ etc are spreading through USB drives. Most anti virus programs are unable to detect them and even if they do, in most cases they are unable to delete the file, only quarantine it. Here are the things which you can do if you want to remove such viruses from your USB Drive Whenever you plug a USB drive in your system, a window will appear similar to the one shown below


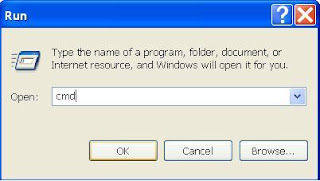
Don’t click on Ok , just choose ‘Cancel’. Open the Command Prompt by typing ‘cmd‘ in the run box.


In the command prompt type the drive letter: and press enter . Now type dir /w/a and press enter.
This will display a list of the files in the pen drive. Check whether the following files are there or not
* Autorun.inf
* Ravmon.exe
* NewFolder.exe
* svchost.exe
* Heap41a
* or any other exe file which may be suspicious.

If any of the above files are there, then probably the USB drive is infected. In command prompt type attrib -r -a -s -h *.* and press enter. This will remove the Read Only, Archive, System and hidden file attribute from all the files. Now just delete the files using the command del filename. e.g Del Ravmon.exe

example del Ravmon.exe. Delete all the files that are suspicious. To be on a safer side, just scan the USB drive with an anti virus program to check whether it is free of virus or not. Now remove the drive and plug it again. In most of the cases, the real culprit turns out to be the “Autorun.inf” file which mostly gets executed when someone clicks Ok in the dialog window which appears above. Thus the infections can spread

Security Tip:
Disable the Autoplay feature of USB drives. If you disable the Autoplay feature of USB drives, then there are lesser chances of the virus spreading.

Wednesday

How to find the IP address of the email sender

0 comments
When you receive an email, you receive more than just the message. The email comes with headers that carry important information that can tell where the email was sent from and possibly who sent it. For that, you would need to find the IP address of the sender. The tutorial below can help you find the IP address of the sender.

If you receive an email sent from a Gmail account through the web browser, you may not be able to find the real IP address because Google hides the real IP address of the sender. However, if someone sends you a mail from his/her Gmail account using a client like Thunderbird, Outlook or Apple Mail, you can find the originating IP address.


Finding IP address in Gmail
  1. Log into your Gmail account.
  2. Open the mail. For which you want to trace the address.
  3. To display the email headers, Click on the inverted triangle beside Reply. Select Show Original


  4. Copy Header displayed in above step and use IP address detection script to ease the process. You can use Free Tool
  5. Look for Received: from followed by the IP address between square brackets [] Received: from mx008.twitter.com (mx008.twitter.com [128.121.146.144])
  6. If you find more than one Received: from patterns, select the last one.
  7. Finally track the IP address of the sender

Finding IP Address in Yahoo! Mail
  1. Log into your Yahoo mail account.
  2. Open the mail for which you want to trace address.
  3. Click the subject of mail you want to trace and right click.
  4. Copy the header displayed in above step and use the IP Detection Tool.
  5. Look for Received: from followed by the IP address between square brackets []
  6. Trace the IP address of the sender.

Tuesday

Print labels for CDs and DVDs

0 comments
Printing labels, whether they are for a DVD or a CD, with an inkjet printer is fairly simple, you do not required any additional software it is already is installed on your computer. The great thing about modern computing is that everyone in the industry assumes that people are creating media in their homes, so you have a lot of options.

Follow the steps:
1. Acquire the physical labels. You can find printable labels in any store selling printer paper. A number of companies manufacture and distribute blank DVD and CD labels that are designed to be used with an inkjet printer. You will also need publishing software to design and print your labels.

2. Design your label with the publishing software.

3. Put the blank DVD labels into the inkjet printer’s paper feed. And Print the label.

4. Carefully peel the new label off of the backing and apply it to the DVD.

5. Firmly press the label to the DVD. Examine it to be certain that you have lined it up properly. If it is not lined up and paper hangs over the edge, you could damage your DVD player.

Google Voice Search for your Phone

0 comments

Good news for mobile users. The user who carry Nokia N-Series or E-Series, Android, Blackberry and iPhone mobile phone. You can now download the Google Mobile app for your Mobile phone and search Google using simple voice commands.

With Google Voice Search app you can search nearest restaurant and you don't have to specify your location as it is location aware. The Google voice search app is integrated with Google Suggest but in addition to regular search queries, the voice app can also auto-suggest websites so you reach your favorites sites more quickly as you no longer have to type the full address of a domain.

This application kept the browse history. Quickly search again for queries you recently performed.

Image Optimization

0 comments
There is always a struggle between quality of the photo placed on the website and its size. Being of high quality the picture also appears to be of big file size and thus requires a lot of time to load, which in its turn causes problems with site viewing. This is where image optimization come to resolve such kind of problems.
Actually, you can do some optimization on your images to make it more suitable for the web presentation. The idea is to reduce the size of your graphics so that they take as few bytes as possible while retaining acceptable quality or make it as visually indifferent.

Let me show you how we can do it:

1. Resize image to the size required. Uploading 2000 x 1000px image and showing it at 600 x 400 px in your html page is of no meaning. You may resize image, or edit picture or even crop photos. Never use images directly from your camera.

2. Upload all images to ImageShack Imageshack – it makes your job faster by providing multiple image uploading feature. Upload all images and get direct url of images. you can use this URL to display the image in your site.

3. you can use some graphical tools to save image into different quality or compression level. You can use Image Optimizer this tool.
It’s really simple to use. Just provide your image url or upload your image and click the “Optimize” button. The website will then process your image and provide you a list of optimized images to choose. You can then save the image to use it.

Recommended: Don’t use GIF format on websites unless the image you use is an animated one. Use PNG as alternative of GIF as they too support transparent backgrounds and occupy less space.
 

2009 - techleren.blogspot.com. All rights reserved.

All content provided in this site are the property of techleren.blogspot.com and is free for non-commercial usage. Read our Privacy Policy here.

Any kind of content on this site cannot be reproduced in any form without permission of the author. We are not responsible for any loss or damage which may occur due to any of our content.